1.2 | Advanced - Pixotope API
Introduction
The Pixotope API enables an external client to:
- feed data into a level
- control or modify objects and adjust settings in a level
It allows for an in-depth level of control over Pixotope Editor via Pixotope Data hub and can be used in:
- Editor mode
- Live mode
The Pixotope API is accessible when using a:
- Pixotope Live license
The Pixotope API uses Protocol Buffers (Protobuf), a flexible, efficient, automated mechanism for serializing structured data.
Schematic
This is how the client code should establish the connection to and communicate with a specified Pixotope machine (Editor) via Data hub.
The Protobuf commands reaching Pixotope are parsed by the Data hub and passed on to the specified machine.

How to use the Pixotope API
Pixotope Data hub is a UDP-based message relay server. It can accept and forward commands/data requests from any client adhering to the Protobuf standard shared by Pixotope. These are the steps required:
1. Implement a UDP socket client
Implement a UDP socket client in any language and bind it to the Data hub IP and Port.
The IP and Port can be found in the Director SETUP → Settings → Network → Data hub.
Check out our available data integration examples:
- Node-RED client - visual programming environment based on node.js
- VaRest Plugin - third-party plugin for Unreal Engine (no Pixotope-specific logic)
- C# client
2. Build functionality for creating Union Request messages and sending them to Data hub via UDP
Create a command/data request based on the Protobuf definition.
Examine the C# example for reference.
The Protobuf definition file can be found in the folder
Pixotope Editor\Engine\Plugins\Pixotope\DataHubClient\ThirdParty\protobuf\messages.proto
3. Implement handshake
The first Union Request message sent by your client to Data hub during a session should be HSReq (HandshakeRequest).
This introduces your client to our messaging system.
4. Implement connected Pixotope Editors list-getting
Query Data Hub to get a list of connected Pixotope Editors, by sending a Union Request containing SearchReq (ProviderSearchRequest).
See point 6, "Implement receiver" in order to receive the list of Editors.
5. Send Pixotope Editor API commands
Send Union Request containing CmndReq (CommandRequest) to Data hub, targeting client names retrieved from the query step using client IDs or obtained by looking into each Editor's config machine name.
Examine the C# example for reference.
6. Implement receiver (optional)
You can also subscribe to available clients in Data hub by implementing a subscription function based on the Protobuf format; subscription helps you get data requests as push notifications.
Examine the C# example for reference.
Data integration example: Node-RED client
Node-RED is an open-source visual programming environment based on node.js. It provides significant data processing and networking capacity with a variety of third-party add-ons.
Node-RED can be used to parse data from various sources and push it to Pixotope Editor.
Check out the example on how to build a Data hub client with Node-RED for simple data integration to Pixotope Editor.
Basic Setup
To set up Node-RED client:
- Install Node-RED:
- Download and install the latest node.js
- Run "
npm install -g --unsafe-perm node-red" in cmd to install Node-RED
Run Node-RED:
- Run "
node-red" in cmd to run Node-RED - Go to http://localhost:1880 in your web browser to see the app
- Run "
- Download Protobuf nodes:
- In the app navigate to "Manage Palette" in the upper-right drop-down menu, and install the "node-red-contrib-protobuf" plugin
- We will be using "encode" and "decode" nodes to handle Protobuf messages coming from/to Data hub
- Get "messages.proto" file:
- This file will be used by Protobuf Encode and Decode nodes as a reference for the handling of our messages
- Please find the file in Pixotope Editor installation files, at the following path:
Engine\Plugins\Pixotope\DataHubClient\ThirdParty\protobuf\messages.proto
- Build the client using Node-RED:
- Create these five nodes and wire them in the order:
- Inject
- Change
- Encode
- Change
- UDP (output)

- Set up the Inject node:
- It will be used to feed an example data string
- Change the payload type to "string"
- Set the payload string to some value, for example: "Test message.".

- Setup the first Change node:
- It will be used to create a JSON UnionRequest message as is defined in "messages.proto"
- Add three rules and set them up as follows:
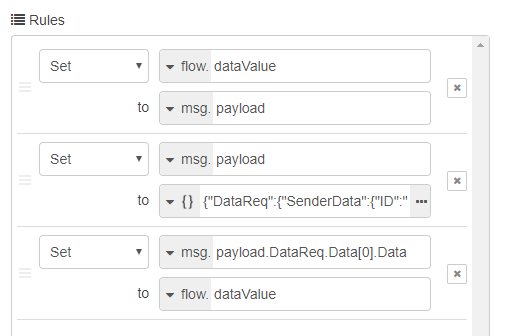
- The first and third rules are used to remember and then reapply our test string. (The third rule sets "
msg.payload.DataReq.Data[0].Data") The second rule defines the JSON to be serialized. Fill it with values relevant to your setup:
{ "DataReq": { "SenderData": { "ID": "DemoClient", "IP": "127.0.0.1", "Port": 7098 }, "Data": [ { "Type": "string", "Data": "" } ] } }
- Set up the Encode node:
- It will be used to serialize our JSON from Change node into a protobuf message
- Set Proto File to our "messages.proto" file
- Set Type to "UnionRequest"
- Set up the second Change node:
- It will be used to define the target Data hub IP and port (new port: 5105). These values will be read by the UDP node
- Add two rules and set them up as follows (or otherwise to match your network setup):
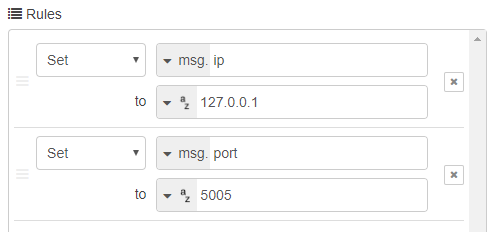
- The UDP node will not require any additional steps: it's just sending messages to Data hub
- Click "Deploy" in the upper-right corner to confirm the changes

- Create these five nodes and wire them in the order:
- Here we go! Our simple Data hub client is ready.
Now anytime you click the blue button next to our Inject node, the test DataReq (look at the JSON and "messages.proto" file) with our string will be pushed to all Pixotope Editors connected to Data hub
To set up Pixotope Editor level:
- Create a new Blueprint inheriting from DataSubcriber class
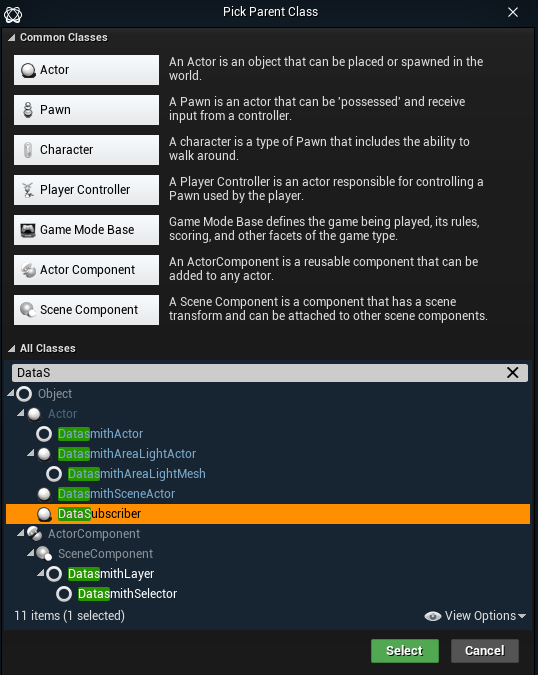
- Give it a name, for example "BP_NodeRedData"

- Go to Blueprint editor and add whatever was your client sender ID set up in Node-RED ("DemoClient" in our case) to Sender Names ("Provider Name" in Pixotope 1.0)

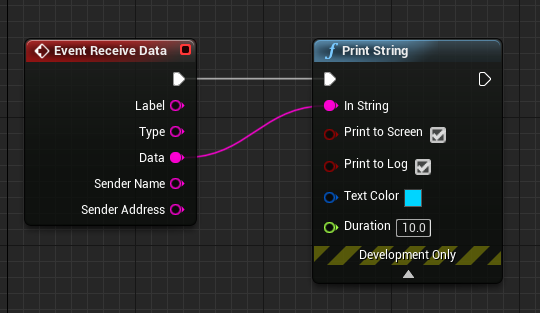
- Go to Event Graph and create a Event Receive Data blueprint node
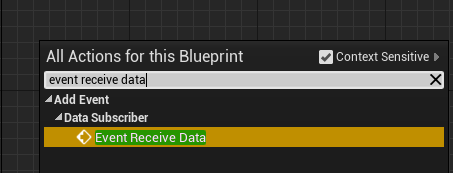
- Create a Print String node and wire the Data pin with it
- Save blueprint changes
- Drag and drop your blueprint to the level in order to spawn it

- Click "Preview Live" to play the level
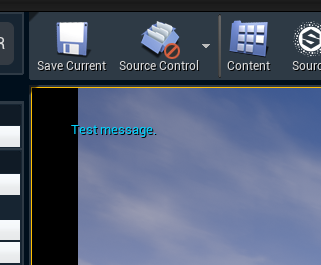
- Now, when you execute your Node-RED setup, you should see your test message being printed in Pixotope
The above setup is the simplest possible data integration with the Node-RED example.
At both ends, the possibilities are endless when it comes to the logic that could be implemented.
In Node-RED one could add HTTP requests to various web APIs and data parsing.
In Pixotope Editor this parsed data could be displayed and animated in various ways, as text, objects or materials, utilizing the full capacity of Unreal Engine 4.
In the case of both Unreal Engine 4 and Node-RED there is a wealth of online learning resources available.
Other examples
The following JSON files can be imported to Node-RED using the Import → Clipboard function.
Remember to fill in the "messages.proto" path.
The following Pixotope project shows how Node-RED data can be used to change a text.
In addition, it also presets alternative data integration with VaRest Plugin.
Data integration example: VaRest Plugin
VaRest is a third-party plugin to UE4 that we are compiling with Pixotope Editor.
It provides functionality for integrating various web REST APIs and for parsing JSON data with blueprints.
More detailed documentation can be found here: https://wiki.unrealengine.com/VaRest_Plugin.
Example project
The following project shows an example implementation of VaRest Plugin in the level blueprint of NewWorld level.
Data integration example: C# client
Here is an example demonstrating how to connect to Data hub and call a function in Pixotope Editor when building a custom C# Data hub client. This code is not complete and is only meant to provide a starting point for further development.
// Steps:
// 1. Get Protobuf libraries for your technology of choice.
// 2. Get DataHub "messages.proto" file.
// 3. Form UDP protobuf messages of type "UnionRequest" (look at "messages.proto").
// Fill in different fields in the "UnionRequest":
// "SetCommandRequest" allows to send commands to connected Pixotope Editor APIs.
// "HandshakeRequest" allows for the initial connection with DataHub.
// 4. Example C# code for calling a function in Pixotope Editor via its API.

// Include protobuf and its auto-generated file
using Google.Protobuf;
using TFG.DataLayer;
// Some class
class DataHub
{

    // Initial handshake request, required to start the connection with Data Hub
    private static void SendHandshakeRequest()
    {
        // Construct request
        UnionRequest UnionRequest = new UnionRequest();
        UnionRequest.HSReq = new HandshakeRequest();
        UnionRequest.HSReq.SenderData = SenderData;
        UnionRequest.HSReq.SenderData.TimeStamp = GetEpochTimeStamp();
        // Send command
        SendUnionRequest(UnionRequest);
    }

    // Client search, returns a list of Pixotope Editor currently connected to Data Hub
    private static void SendSearchForPixotopeEditors()
    {
        // Construct request
        UnionRequest UnionRequest = new UnionRequest();
        UnionRequest.SearchReq = new ProviderSearchRequest();
        UnionRequest.SearchReq.SenderData = SenderData;
        UnionRequest.SearchReq.SearchString = "_Editor";
        UnionRequest.SearchReq.ReturnAddress = false;
        // Send command
        SendUnionRequest(UnionRequest);
    }

    // Ping response (if requestReply equals false), needs to be used to keep the connection alive
    public static void SendPingRequest(bool requestReply = true)
    {
        // Construct request
        UnionRequest UnionRequest = new UnionRequest();
        UnionRequest.PingReq = new PingRequest();
        UnionRequest.PingReq.SenderData = SenderData;
        UnionRequest.PingReq.RequestReply = requestReply;
        UnionRequest.PingReq.SenderData.TimeStamp = GetEpochTimeStamp();
        // Send command
        SendUnionRequest(UnionRequest);
    }

    // Commands are pushed to clients, not requiring subscription on the other end
    public static void SendCommandRequest(List<string> receivers, string command, List<string> arguments)
    {
        // Check if there are any target receivers
        if (receivers != null && receivers.Count > 0)
        {
            // Construct request
            UnionRequest UnionRequest = new UnionRequest();
            UnionRequest.CmndReq = new SetCommandRequest();
            UnionRequest.CmndReq.SenderData = SenderData;
            foreach (string receiver in receivers) UnionRequest.CmndReq.ReceiverID.Add(receiver);
            // Construct command packet
            UnionRequest.CmndReq.Command = new CommandPacket();
            UnionRequest.CmndReq.Command.TimeStamp = GetEpochTimeStamp();
            foreach (string receiver in receivers) UnionRequest.CmndReq.Command.ReceiverID.Add(receiver);
            UnionRequest.CmndReq.Command.Command = command;
            if (arguments != null) foreach (string argument in arguments) UnionRequest.CmndReq.Command.Arguments.Add(argument);
            // Send command
            SendUnionRequest(UnionRequest);
        }
    }

    // An example for the use of commands with Pixotope Editor API
    public static void CallFunction(string ActorName, string FunctionName, List<string> Arguments)
    {
        // Check if Data Hub connection is established
        if (IsConnected())
        {
            // Set arguments
            List<string> arguments = new List<string>();
            arguments.Add(ActorName);
            arguments.Add(FunctionName);
            arguments.AddRange(Arguments);
            // Send command
            SendCommandRequest(GetSetTargetIDs(), "CallFunction", arguments);
        }
    }

    // An example of received message parsing
    private static void ReceiveUnionRequest(UnionRequest UnionRequest)
    {
        // Data Response
        if (UnionRequest.DataReq != null && UnionRequest.DataReq.Data != null && UnionRequest.DataReq.Data.Count > 0)
        {
            // Handle received data here
            // To receive data, you must first subscribe to some data provider (like Pixotope Editor) using protobuff SubcribeRequest
        }
        // Handshake Response
        if (UnionRequest.HSRes != null)
        {
            // Request Pixotope Editors
            SendSearchForPixotopeEditors();
            // Handle connection success here
        }
        // Provider Search Response
        if (UnionRequest.SearchRes != null)
        {
            // Pixotope Editors
            if (UnionRequest.SearchRes.SearchString.Equals("_Editor"))
            {
                // Parse Pixotope Editors list
                List<ProviderSearchResult> SearchResults = UnionRequest.SearchRes.SearchResults.ToList();
                List<string> PixotopeEditors = new List<string>();
                foreach (ProviderSearchResult searchResult in SearchResults) PixotopeEditors.Add(searchResult.ID);
                // Handle the newly equired list of Pixotope Editors here
            }
        }
        // Ping Response
        if (UnionRequest.PingReq != null)
        {
            if (UnionRequest.PingReq.RequestReply)
            {
                // Respond to heartbeat ping
                SendPingRequest(false);
            }
        }
    }

    // An example UDP listener
    private static void UdpListener()
    {
        Task.Run(async () =>
        {
            // Receive
            while (true)
            {
                var receivedResults = await UdpClient.ReceiveAsync();

                UnionRequest UnionRequest = new UnionRequest();
                UnionRequest.MergeFrom(receivedResults.Buffer);
                ReceiveUnionRequest(UnionRequest);
            }
        });
    }

    // An example for how to handle frequent sending
    // Simpler sending would also be fine
    public static void SendUnionRequest(UnionRequest UnionRequest)
    {
        // Enqueue
        RequestQueue.Enqueue(UnionRequest);
        // Remove overflow
        lock (RequestQueue)
        {
            while (RequestQueue.Count() > RequestQueueMaximumLength) RequestQueue.Dequeue();
        }
    }

    // An example UDP sender
    private static void UdpSender()
    {
        Task.Run(async () =>
        {
            while (true)
            {
                // Send if there is a message queued
                if (RequestQueue.Count() > 0)
                {
                    lock (RequestQueue)
                    {
                        // Dequeue
                        UnionRequest request = RequestQueue.Dequeue();

                        // Check if action request was formed
                        if (request != null)
                        {
                            // Convert the object to binary using Google Protobuf library
                            Byte[] Bytes = request.ToByteArray();
                            // Send
                            {
                                try
                                {
                                    // Create IP endPoint
                                    IPEndPoint endPoint = new IPEndPoint(DataLayerIP, DataLayerPort);
                                    // Send the byte array to the server
                                    UdpClient.Send(Bytes, Bytes.Length, endPoint);
                                }
                                catch { }
                            }
                        }
                    }
                }
                // Wait
                Thread.Sleep(SendDelay);
            }
        });
    }
}Pixotope Engine API reference
The API exposed by Pixotope Editor to Data hub allows almost complete control over Pixotope, whether it is running in Editor or Live (Game) mode.
Protobuf commands reaching Pixotope are parsed by the DataHubClient plugin.
Below you will find a full list of currently supported commands together with the accepted parameters.
Command returns
In the event of failure, all commands return an "APIError" SetData message, with the command name and a list of arguments used.
Some commands also return SetData messages with JSON strings, providing subscribers with requested information via Data hub.
Command arguments
Object Search
Many commands take "Object Search" as their first argument. This permits targeting a world's actors, components and some other special objects with the commands.
Typically, in order to target actors, you can simply type a unique name ("ID name") of this actor. To find out the ID name of an actor, move the mouse over the label of the actor in World Outliner in the Editor, and the ID name will be shown in the tooltip.
Object search also accepts certain predefined names for targeting special objects:
- tracked_camera
- camera_root
- material_handler
- main_post_process_volume
- api_manager
- video_io_controller
- world_settings
- machine_settings
- compositing_planes
Otherwise, the object search will by default look for the first actor in the scene of the given name.
Alternatively, it is possible to access the following advanced search modes:
- . (component search, by adding a dot after the actor's name and following it with the component name, e.g. "SomeActor0.SomeComponent23")
- all_of_type (followed by a type name will return all actors of a given type currently existing in the scene)
- first_of_type (followed by a type name will return the first actor of a given type currently existing in the scene)
Property Path
The property path is used to target certain properties (fields) on objects. For properties existing directly in a particular object's class, the property path will be just this property's name.
However, for children of struct properties, the path will consist of consecutive property names separated with a dot.
For example: Parameters.Position.X (targeting float X in vector Position in struct Parameters).
Ignore Property Value
If we are sending SetProperty or SetSettings, we might sometimes want our call to be ignored for particular properties.
To achieve that pass :::ignore::: string as a value.
Settings Group
Certain commands require SettingsGroup as an argument. Those typically aim to streamline setting and getting of multiple properties at once, as is helpful when managing huge loads of settings.
The following SettingsGroups are currently available:
- VSCompositing
- ARCompositing
- CommonCompositing
- VideoPostProcessSettings
- VideoColorGrading
- VideoColorGradingOverrides
- VideoTonemapper
- VideoTonemapperOverrides
- VideoEffects
- VideoEffectsOverrides
- GraphicsColorGrading
- GraphicsColorGradingOverrides
- GraphicsTonemapper
- GraphicsTonemapperOverrides
- GraphicsEffects
- GraphicsEffectsOverrides
- RenderingFeatures
- RenderingFeaturesOverrides
Error Handling
In the event of failure, all commands return an "APIError" SetData message, with the command name and a list of arguments used.
Commands
Commands marked with [1.0+] are available only in Pixotope 1.0 and above. The rest can be used also in Frontier 2.1.
OBJECT SETTING
Command: SetProperty
Description: Set a property value for a given actor. Apart from basic types, supports properties in structs, arrays and asset names.
Arguments:
[0] - Object Search
[1] - Property Path
[2] - Value
Command: ResetProperty
Description: Reset a property value for a given actor.
Arguments:
[0] - Object Search
[1] - Property Path
Command: CallFunction
Description: Call a method on a given actor. This is the main and recommended way of handling live input and controls.
Arguments:
[0] - Object Search
[1] - Function Name
[2..] - Function Arguments
Return Type: FunctionReturn
Return JSON Fields:
- Object (string)
- Function (string)
- ReturnedValues (array of strings)
Command: SetVisibility
Description: Set actor's / component's visibility.
Arguments:
[0] - Object Search (Actors only)
[1] - Visibility Value (bool)
Command: ResetVisibility
Description: Reset the actor's / component's visibility.
Arguments:
[0] - Object Search (Actors only)
Command: SetMobility
Description: Set an actor's / component's mobility.
Arguments:
[0] - Object Search (Actors only)
[1] - Mobility Value (string: NO_TRANSFORM, STATIC, STATIONARY, or MOVABLE)
Command: ResetMobility
Description: Reset the actor's / component's mobility.
Arguments:
[0] - Object Search (Actors only)
Command: SetTransform
Description: Set actor's or component's relative transform.
Arguments:
[0] - Object Search (Actors and Components only)
[1..9] - Transform Values, consecutively: LocX, LocY, LocZ, RotX, RotY, RotZ, SclX, SclY, SclZ
[10] - Is Transform Delta (optional, false by default) (bool)
[11] - Is Local Translation (optional, false by default) (bool)
[12] - Is Local Rotation (optional, false by default) (bool)
Command: ResetTransform
Description: Reset object's transform.
Arguments:
[0] - Object Search (Actors and Components only)
[1..9] - Reset Pattern (optional, all true by default) (array of bools)
Command: SetRenderLayer
Description: Set actor's or component's render layer.
Arguments:
[0] - Object Search
[1] - Value (FOREGROUND / AR_HOLDOUT / AR_SHADOW_CATCHER / VS_TRANSLUCENT / AR_TRANSLUCENT)
Command: ResetRenderLayer
Description: Reset the actor's or component's render layer.
Arguments:
[0] - Object Search
Command: ResetObject
Description: Reset all object's adjustments.
Arguments:
[0] - Object Search
OBJECT SPAWNING
Command: SpawnActor
Description: Spawn a new actor.
Arguments:
[0] - Actor Class Name
Command: DeleteSpawnedActor
Description: Delete an existing actor. Works only for the actors previously spawned through the API.
Arguments:
[0] - Object Search (Actors only)
Command: DeleteAllSpawnedActors
Description: Delete all spawned actors.
Arguments: No arguments.
Command: RenameSpawnedActor
Description: Rename a previously spawned actor.
Arguments:
[0] - Object Search (Actors only)
[1] - New Name
Return Type: RenameSpawnedActor
Return JSON Fields:
- OldName (string)
- NewName (string)
- NewPrettyName (string)
OBJECT GETTING
Command: GetProperty
Description: Send JSON describing the property to DataLayer.
Arguments:
[0] - Object Search
[1] - Property Path
[2] - Recursion Depth (optional, 1 by default)
Return Type: Property
Return JSON Fields:
- Owner (string)
- Path (string)
- Name (string)
- PrettyName (string)
- Type (string)
- AdjustmentStatus (string) (only 1.0+)
- Properties (array of properties)
- Value (string) or Values (array of properties)
- Options (array of strings)
Command: GetFunction
Description: Send JSON describing a function to DataLayer.
Arguments:
[0] - Object Search
[1] - Function Name
Return Type: Function
Return JSON Fields:
- Owner (string)
- Name (string)
- PrettyName (string)
- Arguments (array of properties)
Command: GetTransform
Description: Send JSON describing an actor's or component's relative transform to DataLayer.
Arguments:
[0] - Object Search (Actors and Components only)
Return Type: Transform
Return JSON Fields:
- Owner (string)
- Location (array of numbers)
- Rotation (array of numbers)
- Scale (array of numbers)
Command: GetObject
Description: Send JSON describing an actor to DataLayer.
Arguments:
[0] - Object Search
[1] - Recursion Depth (optional, 1 by default)
Return Type: Object
Return JSON Fields:
- Name (string)
- PrettyName (string)
- Type (string)
- AdjustmentStatus (string) (only 1.0+)
- Functions (array of functions)
- Properties (array of properties)
- Components (array of objects)
- Visibility (bool)
- Mobility (string: NO_TRANSFORM, STATIC, STATIONARY, or MOVABLE)
- RenderLayer (string) (only 1.0+)
Command: GetWorld
Description: Send JSON describing the currently active world to DataLayer. The returned description is divided into batches (identifiable by BatchNumber) to avoid UDP message size limits.
Arguments:
[0] - Include Actors (optional, true by default) (bool)
[1] - Recursion Depth (optional, 1 by default)
Return Type: World
Return JSON Fields:
- Name (string)
- PrettyName (string)
- Type (string)
- CompositingMode (string) (only 1.0+)
- IsDirty (bool) (only 1.0+)
- BatchIndex (number)
- NumberOfBatches (number)
- Actors (array of objects)
- SpecialActorNames (dictionary-like array of tags and names) (only in the first batch) (only 1.0+)
SETTINGS
Command: SetSettings
Description: Set Pixotope settings group.
Arguments:
[0] - Settings Group
[1..] - Values
Command: ResetSettings
Description: Reset Pixotope settings group.
Arguments:
[0] - Settings Group
Command: GetSettings
Description: Send current values of a settings group to DataLayer.
Arguments:
[0] - Settings Group
[1] - Include Details (bool) (optional)
Return Type: Settings
Return JSON Fields:
- SettingsGroup (string)
- Values (array of strings)
- ObjectName (string) (optional)
- Paths (array of strings) (optional)
- Types (array of strings) (optional)
ADJUSTMENTS
Command: WerePostProcessSettingsModified
Description: Check if post-process settings were modified. If called for multiple objects, will return true only if applies to all.
Arguments: No arguments.
Return Type: WerePostProcessSettingsModified
Return JSON Fields:
- Return (bool)
Command: WasPropertyModified
Description: Check if a particular property was modified. If called for multiple objects or properties, will return true only if applies to all.
Arguments:
[0] - Object Search
[1] - Property Path
Return Type: WasPropertyModified
Return JSON Fields:
- ObjectSearch (string)
- PropertyPath (string)
- Return (bool)
Command: WasObjectModified
Description: Check if a particular object was modified.
Arguments:
[0] - Object Search
Return Type: WasObjectModified
Return JSON Fields:
- ObjectSearch (string)
- Return (bool)
Command: WasObjectSpawned
Description: Check if a particular object was spawned.
Arguments:
[0] - Object Search
Return Type: WasObjectSpawned
Return JSON Fields:
- ObjectSearch (string)
- Return (bool)
Command: WasAnyObjectSpawned
Description: Check if any object was spawned.
Arguments: No arguments.
Return Type: WasAnyObjectSpawned
Return JSON Fields:
- Return (bool)
Command: WasAnythingModifed
Description: Check if any object, parameter or setting was modified in this world.
Arguments: No arguments.
Return Type: WasAnythingModifed
Return JSON Fields:
- Return (bool)
Command: ResetAllAdjustments
Description: Reset all adjustments applied to this world.
Arguments: No arguments.
Command: BakeAllAdjustments
Description: Bakes all adjustments permanently into the world. Works in the editor mode only.
Arguments: No arguments.
OTHER
Command: ReloadMachineSettings
Description: Reload machine settings from the file.
Arguments: No arguments.
Command: ExecuteConsoleCommand
Description: Send current screen-space post-processing settings to DataLayer.
Arguments:
[0] - A console command to execute
Command: GetCompositingMode
Description: Send the compositing mode of the current world.
Arguments: No arguments.
Return Type: CompositingMode
Return JSON Fields:
- Mode (string)
Command: OpenLevel
Description: Load a new level without closing the project.
Arguments:
[0] - Level Path (ex. Levels/TestMap0)
Command: GetAutolayout
Description: Send a list of function descriptions that were marked for control panel auto-layout.
Arguments:
[0] - Object Search
Command: ExecuteTTMCommand
Description: Call a command with arguments on a Texture Transfer Module process running next to this Pixotope.
Arguments:
[0] - TTM Command
[1..] - TTM Command Arguments
Return Type: TTMData or TTMFrame or none
Return JSON Fields (for TTMFrame):
- BatchIndex (number)
- NumberOfBatches (number)
- BatchSize (number)
- FrameSize (number)
- Batch (string)
Command: ExecuteBlenderPipelineCommand
Description: Call a command with arguments on a Blender Pipeline plugin in this Pixotope.
Arguments:
[0] - Blender Pipeline Command
[1..] - Blender Pipeline Command Arguments
Return Type: BlenderPipelineData