1.3 | Pixotope SDK
What is it?
The Pixotope SDK contains public source code and other files that are not released with the base version of Pixotope. When installed together with Pixotope, the SDK enables power users to develop their own C++ code to work with Pixotope.
As of the 1.2.0 release, the Pixotope SDK does not expose any proprietary functionality to be accessible through C++. It currently only allows users to access features already available within vanilla UE4.
Where do I get it?
Contact customer support.
Prerequisites
The following are prerequisites for compiling plugins:
- Windows 10 (64-bit)
- Pixotope
- Microsoft Visual Studio 2017 (with the C++ Desktop extensions included)
Installation (with Installer)
- Make sure you have the base Pixotope installed.
- Download the Pixotope SDK installer from the link provided.
- Make sure that the version number of the Pixotope SDK shown in the installer filename matches the version number of your Pixotope installation. (You can check the version number in Pixotope Director in the Windows menu under "Help".)
- Run the installer. The installation path is defined in the registry under
Computer\HKEY_LOCAL_MACHINE\SOFTWARE\The Future Group\Pixotope Suiteas "LastInstallPath". Unless you have multiple Pixotope installations, this value doesn't need to be modified.
Installation (with .zip)
- Make sure you have the base Pixotope installed.
- Download the Pixotope SDK zip file from the link provided. This is 6 GB in size.
- Make sure that the version number of the Pixotope SDK shown in the zip filename matches the version number of your Pixotope installation. (You can check the version number in Pixotope Director in the Windows menu under "Help".)
- Unzip the files to a temporary folder (21.3 GB of disk space required). NB: The unzipping process may stall for a long time because of Windows virus checking. Under Windows Security > "Virus & threat protection" settings, turn off "Real-time protection" temporarily.
- Copy the unpacked
Pixotope Editorfolder over thePixotope Editorfolder from your installation folder. Agree to replace files.
Building custom plugins
To speed up the development process, you can develop your plugin with the version of vanilla Unreal Engine that corresponds to the version of UE4 that your Pixotope installation is based on.
Once you are ready to deploy your plugin for Pixotope, you need to build it with the Unreal Automation Tool from the Pixotope SDK folders.
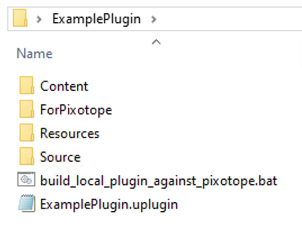
The following batch file does exactly that, when executed in your plugin's folder. (You can also find it in your Pixotope SDK installation folder under dev_scripts.)
build_local_plugin_against_pixotope.bat
@ECHO off

REM Please copy this batch file and execute it inside your plugin folder (next to the .uplugin file).
REM Make sure you have Pixotope and Pixotope Dev Kit installed beforehand.
REM Resulting compiled plugin will be generated in /ForPixotope folder.
REM Remember to remove your /Source from /FromPixotope, before distributing /ForPixotope folder's contents, if you desire to keep your code private.

REM Make sure the following line represents the Pixotope version you want to use.
SET engine_version=1.2.0

FOR /F "skip=2 tokens=2,*" %%A IN ('reg.exe query "HKLM\SOFTWARE\The Future Group\Pixotope Suite\%engine_version%" /v "InstallDir"') DO SET "install_dir=%%B"

FOR %%a IN ("%~dp0\.") DO SET "parent=%%~nxa"

ECHO Building %parent%.uplugin against the engine at %install_dir%

"%install_dir%Pixotope Editor\Engine\Build\BatchFiles\RunUAT.bat" BuildPlugin -Plugin="%~dp0%parent%.uplugin" -Package="%~dp0ForPixotope" -UsePrecompiled -TargetPlatforms=""The batch file, when run next to the .uplugin file, will generate a ForPixotope folder containing your compiled plugin. Make sure to delete any source code that you want to keep private and that might have been copied inside in the process.
Also, please keep in mind that the ForPixotope plugin folder needs to be renamed so as to have the same name as the .uplugin file!

The provided batch file will help you successfully compile plugins that already successfully compile with the full UE4 vanilla source as Engine plugins (plugins in the Engine\Plugins folder). Many publicly available plugins were not written to work this way. In such a case, please create a C++ project and compile your plugin with it (by creating a Plugins folder in your project folder, pasting your plugin inside, and regenerating the project files).
This is advanced UE4 programming! Read up on it online as much you can.
NB: The resultant plugin may generate a version warning, saying that it was compiled for 4.23.0, when in fact you are running 4.23.1. In this case, just edit the .uplugin file and change the EngineVersion to 4.23.1. That will prevent the warning from appearing.
Building C++ projects
Once you have the Pixotope SDK installed, you can also start C++ projects with Pixotope. Any machine that runs such a project will need to have the Pixotope API installed.
To create a new C++ project, start the engine directly from the executable \Pixotope Editor\Engine\Binaries\Win64\UE4Editor.exe
Afterwards, add your project's folder path in Pixotope Director in the "General" panel.
We strongly advise against using C++ projects, as they can introduce many unexpected crashes and inconsistencies. We recommend implementing your custom functionality using well-tested plugins and Blueprint logic.
Remember that building your custom functionality responsibly, especially within an environment as complex as Unreal Engine 4, requires a lot of testing, preferably by professionals with a QA background.
We can only provide limited support for C++ projects.