1.5 | Adjusting compositing, effects and color grading
After finishing setup:
- Switch the view in Director from SETUP to PRODUCTION
Make live adjustments on running levels:
- Object panel - Allows you to easily change properties and make a transformation to objects in the level
- Video Composite panel - Allows you to make adjustments to the internal compositing
- Effects panel - Allows you to make adjustments to various post-processing effects
- Color Grading panel - Allows you to make adjustments to various color grading properties
Learn more about the different views in Director: 1.5 | Adjusting levels from Director.
Learn how to make adjustments in a multi-machine setup.
Adjusting objects
The object panel lets you make adjustments to one or more objects.
- Select one object or multiple objects from the Object browser
- Make adjustments
You can make the following adjustments:
- Transform objects
- Change exposed properties
If multiple objects are selected, only the common properties are selectable

Learn more about how to expose properties.
These operations can be performed in both Live mode and Editor mode. The only difference is how adjustments are saved and applied.
Learn more about where adjustments are saved.
Transform
Transform your objects by clicking the numeric boxes or typing in your desired number in the X-, Y- and Z-axes. To reset the transformation to the original values, click the reset icon.
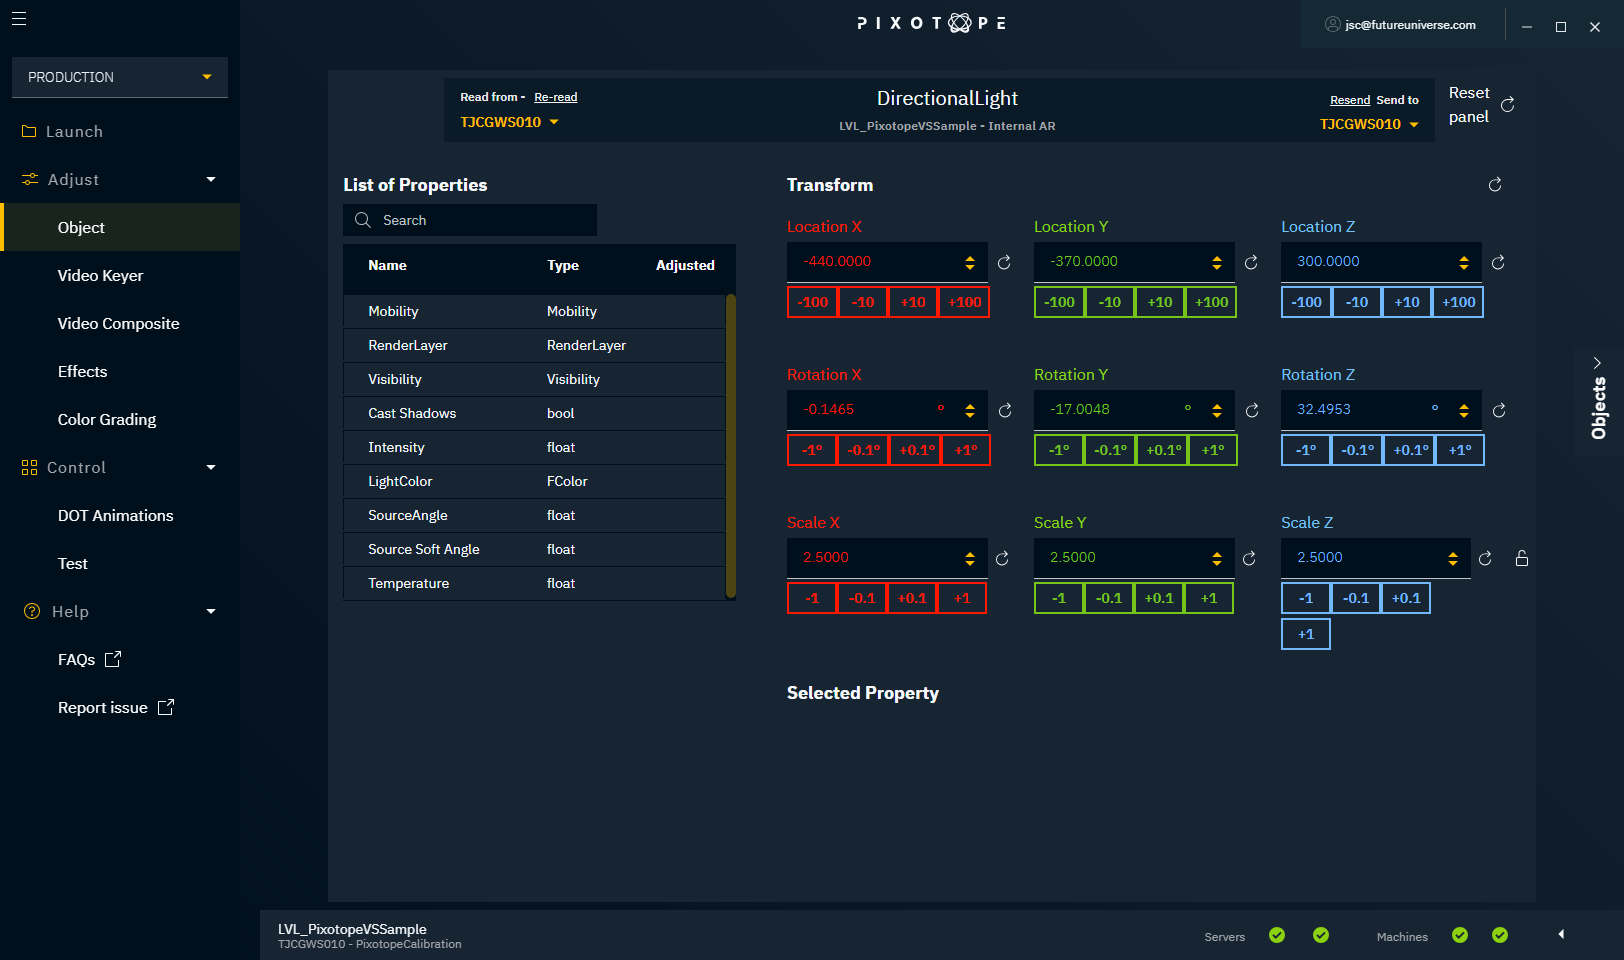
Make sure the level with the objects you want to adjust is running on the correct machine and that it is selected as the machine you read from in the header.
To get a list of all objects in your scene, open the Objects browser on the right side of the panel by clicking "Objects".
Object browser
The Objects browser lists all objects, together with some additional information.
Here you can:
- select one or more objects and then adjust them in the "Object" panel
- click "Adjust" to make adjustments to only one object
- select multiple objects and click "Adjust objects"
- remove adjustments that were made earlier
- select multiple objects and click "Remove Adjustments"

Visibility
Shows whether the object is visible in the Editor/Live mode.
Adjusted
Shows whether one or more values of an object were adjusted through the Adjustment panels.
Name
Shows the display name of each object and, if different, the unique Name (ID Name) in gray.
Object Type
Shows the type of the object.
Mobility
Shows whether the object is static or movable.
Render Layer
Shows the Pixotope-compositing-specific qualities of certain meshes, like AR Shadow Catching or Translucency.
Adjusting compositing
In the compositing panel, you can change the settings for how 3D graphics and video get composited together. The quality of the compositing depends on the chosen compositing color space.
These settings do not apply when the Compositing mode is set to External.
Learn more about Compositing modes and compositing color space, color management and linear compositing.
3D Graphics
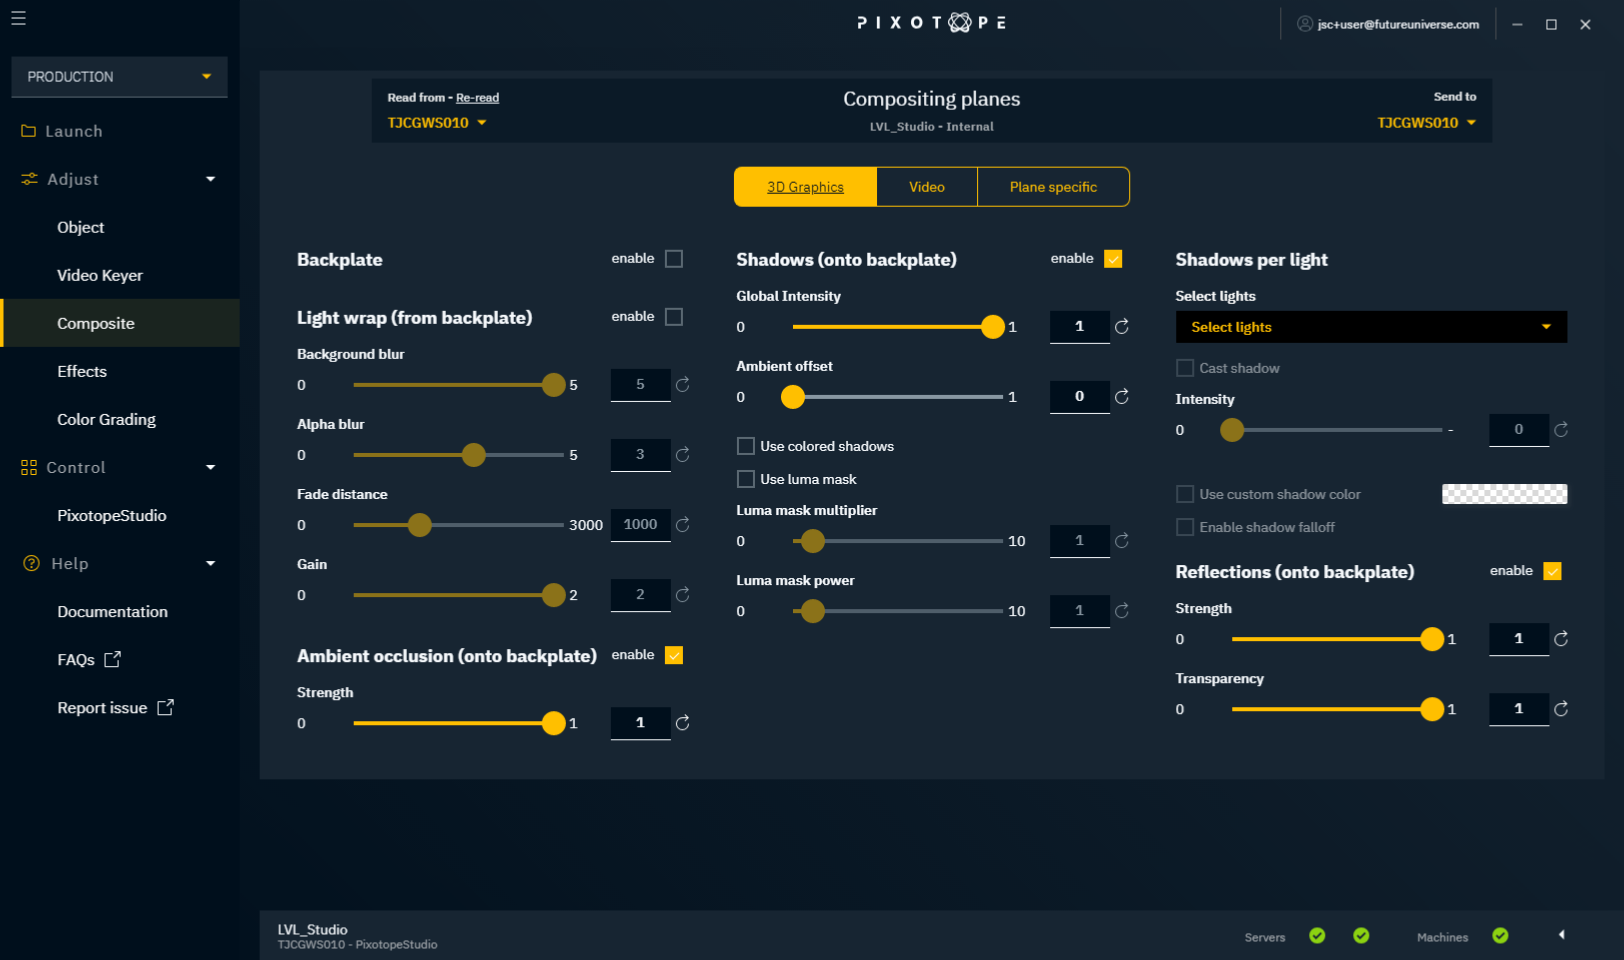
Here you control the compositing effects of all 3D objects in the scene.
Backplate
When enabled, the routed camera system is used as a backplate.
Enable backplate to do AR!
Light wrap (from backplate)
When enabled, you can adjust the spilling of light from the backplate onto the 3D graphics.
Background blur
Controls how much the backplate is blurred before applying the light wrap.
Alpha blur
Controls the blur of the alpha stencil for AR objects. A higher value results in more blur.
Fade distance
Controls the fading of the blur (linear).
Gain
Controls the gain of the light wrap effect. A higher value results in a stronger effect.
Ambient occlusion (onto backplate)
Ambient occlusion is basically an effect that creates a more natural ambient lighting in the scene. It calculates how objects (occlusions) are exposed to ambient lighting and creates a diffuse non-directional shading effect in sheltered and enclosed areas. When enabled, you can make live adjustments to the ambient occlusion effect onto the backplate.
Strength
Controls the strength of ambient occlusion.
Shadows (onto backplate)
When enabled, you can make adjustments to the shadows cast by the 3D graphics.
Intensity
Controls the global shadow intensity.
Use colored shadows
When enabled, the inverse light color is used as a shadow color.
A custom shadow color can be set per light. See Shadows → Per light → Use custom shadow color.
Use luma mask
To improve the overlapping of virtual and real shadows, the luma channel of the backplate video is used as a mask for the shadows.
Luma mask multiplier
Controls the intensity of the luma mask effect.
Luma mask power
Controls the falloff of the luma mask effect.
Per light
Select one or more lights to apply the following settings:
Cast shadow
Enables shadow casting.
Intensity
Controls the shadow intensity.
Use custom shadow color
Overrides the shadow color. Needs the global "Use colored shadows" to be enabled.
Enable shadow falloff
Enable the shadow falloff.
Reflections (onto backplate)
When enabled, you can make adjustments to the reflections of the 3D graphics cast onto the backplate.
Strength
Controls the strength. A higher value gives a stronger/more defined reflection.
Transparency
Controls the transparency of the reflections. A higher value makes it more transparent.
Video
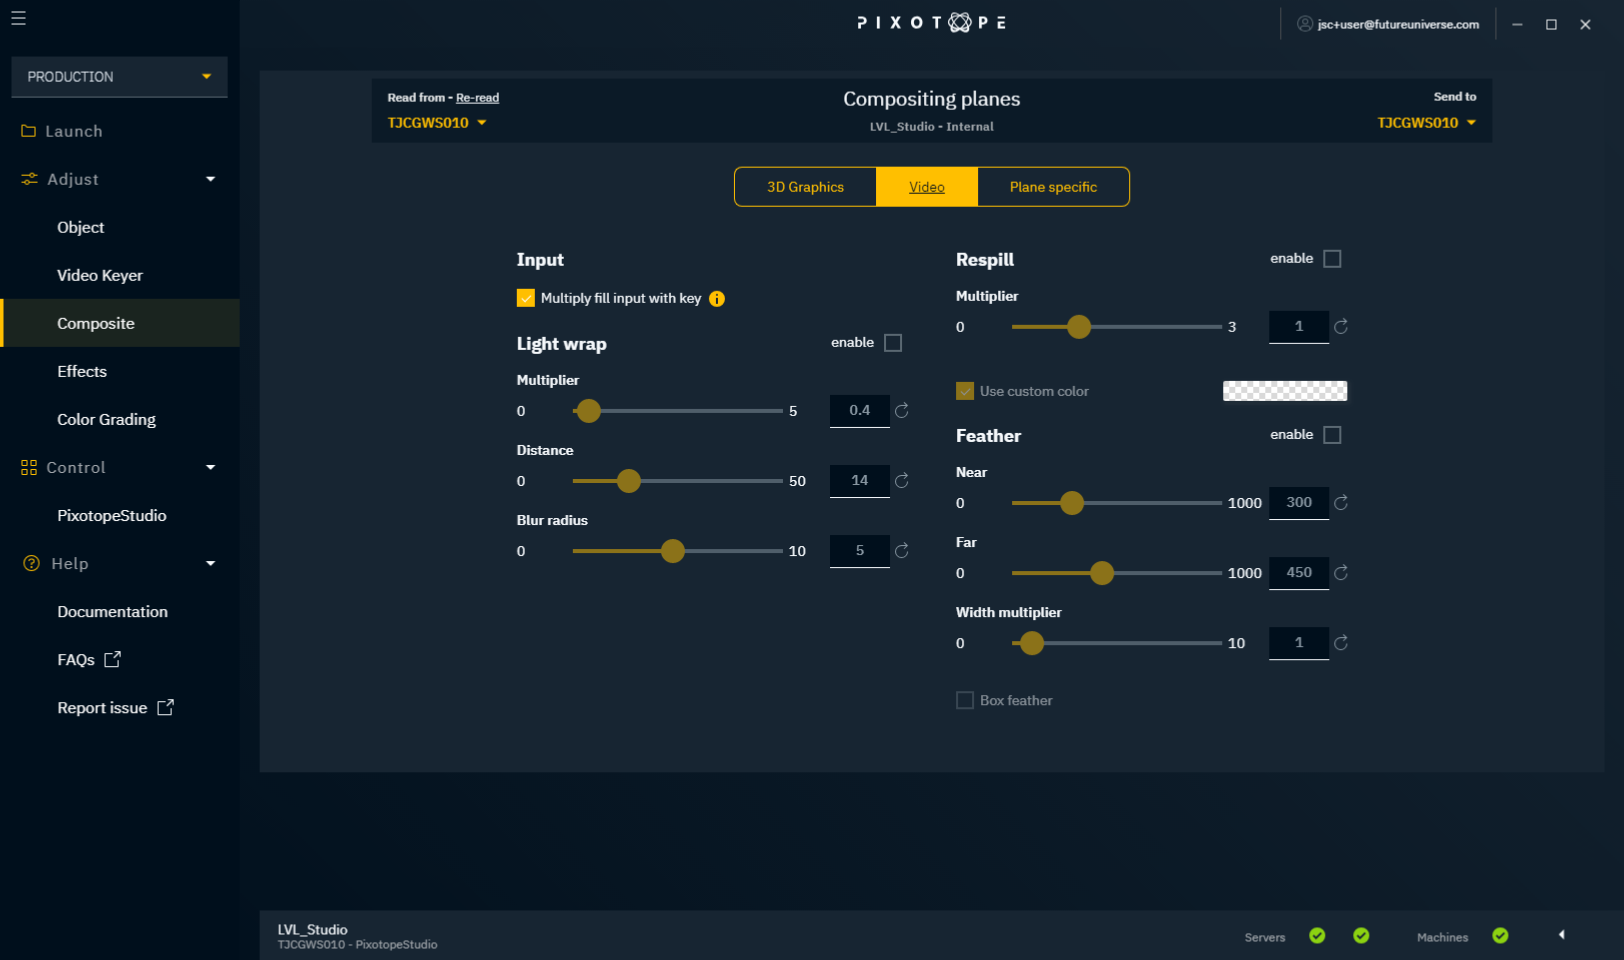
Input
Multiply fill input with key
Disable when using an external keyer.
Light wrap (from 3D graphics)
Light wrapping is used to prevent a sharp edge on the alpha mask so that the talent and/or real objects blend better in the scene. Note: Correct lighting in the graphics and on the talent/object is very important.
When enabled, you can make adjustments to the light wrapping effect on the alpha mask.
Multiplier
Controls the amount of light wrapping effect applied. A higher value produces a stronger effect.
Distance
Controls the distance (in pixels) that the effect works inwards on the alpha mask.
Blur radius
Controls the amount of blur added to the effect. A higher value results in more blur.
Respill
Respill can improve the visual integration of the keyed object into the scene. When enabled, sampled colors from the scene are applied to the edge of the keyed object.
Multiplier
Controls the amount of respill.Use custom color
Pick a custom color for the respill.Feather
Applies a feather on the internal compositing planes. This is done in world space.
Near
The near limit of the feather effect.
Far
The far limit of the feather effect.
Width Multiplier
The aspect ratio of the feather effect.
Box feather
Enable box feather.
Plane specific
.png?inst-v=e18ca11a-3fdb-407a-9b93-af560f8c2168)
In this view, you can create and move:
- VS Internal compositing planes - used to place video into your scene
- AR Reflected planes - used to cast reflections onto 3D graphics
List of compositing planes
This table shows a list of all internal compositing and universal compositing planes in the level.
Transform
Location
Move the selected plane on the corresponding X-, Y- or Z-axis by the desired increment.
Rotation
Rotate the selected plane on the corresponding X-, Y- or Z-axis by the desired increment.
Scale
Adjust the scale of the selected plane on the corresponding X-, Y- or Z-axis by the desired increment
Settings
Rotate with Camera
Locks the rotation onto the tracked camera in a way that forces the plane to always face the camera.
Cast virtual shadows
Adds virtual shadow casting of the plane.
Show preview color
Setting this allows you to show a preview color for debugging.
Adjusting effects
Unreal Engine provides high-quality lens and image effects that simulate how a real camera works and that can be used to enhance the realism of graphics and make integration with video easier.
Effects applied to Graphics
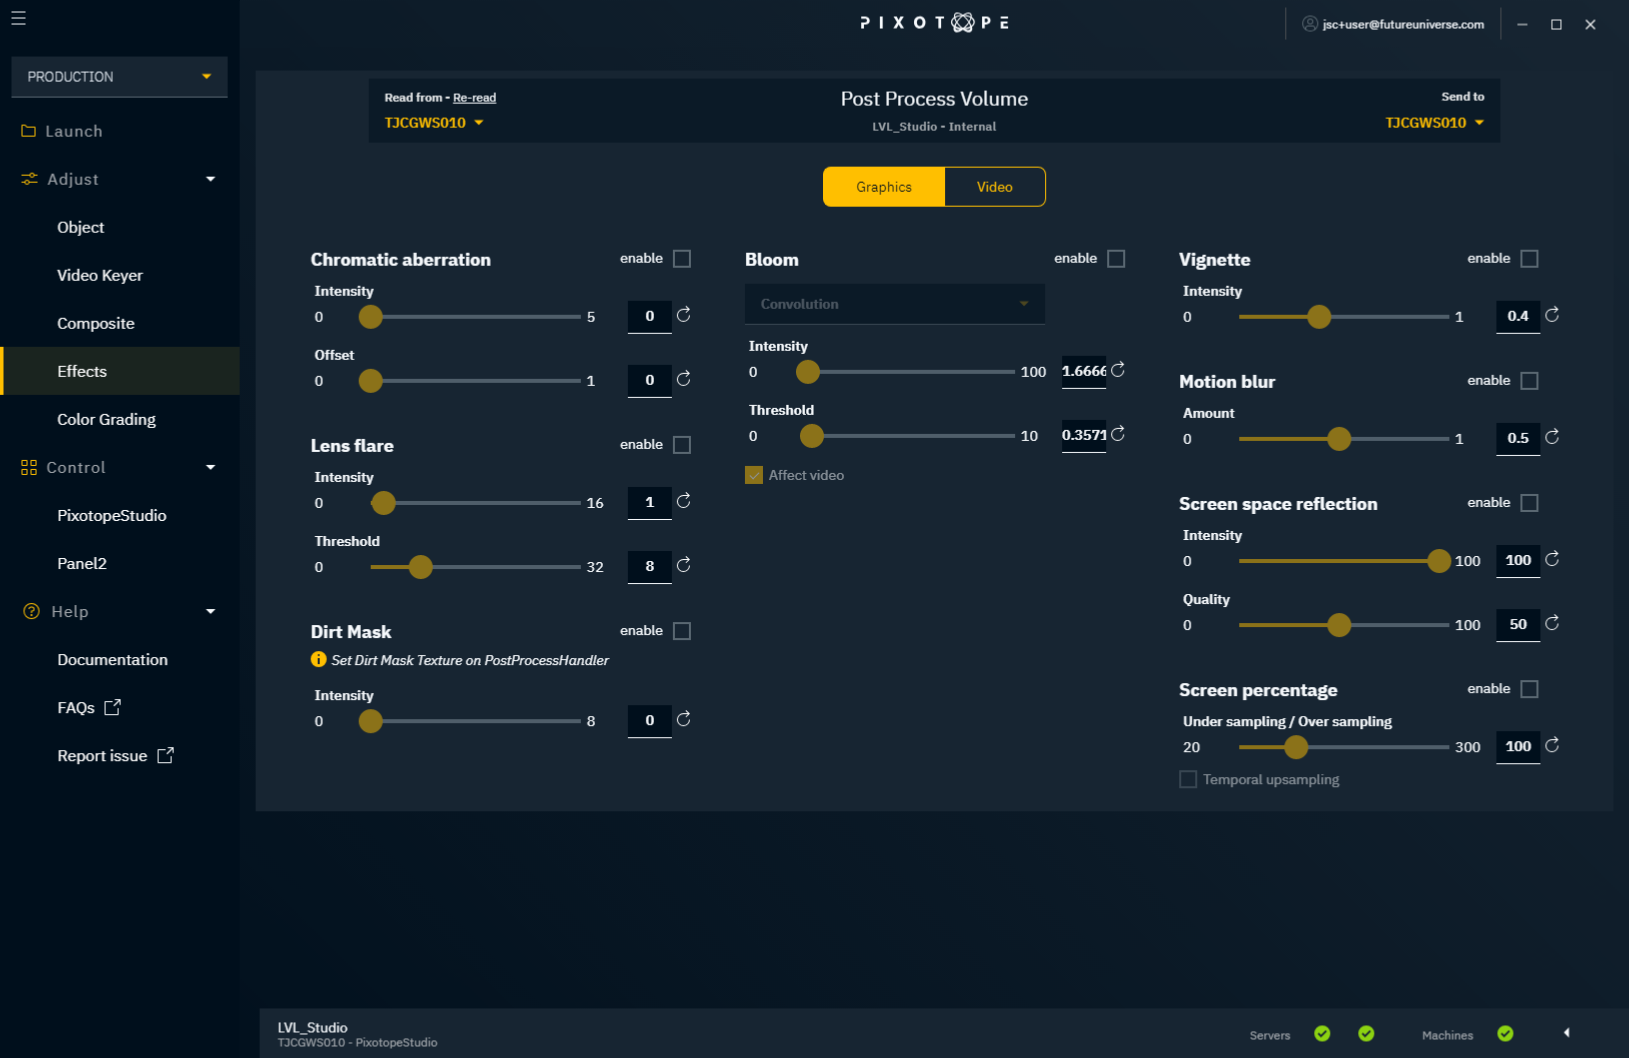
Chromatic aberration
Chromatic aberration manifests itself as "fringes" of color along boundaries that separate dark and bright parts of the image.
Intensity
Offset
Lens flare
Simulates the lens flare effect that happens on real-world cameras when viewing bright objects. When enabled, you can make adjustments.
Intensity
Brightness scale of the image-based lens flares (linear).
Threshold
Defines the minimum brightness of pixels that contribute to the lens flare. Setting a high threshold prevents very dark content from being blurred; it also improves performance, as the fill rate cost increases linearly with the number of pixels passing the threshold.
Dirt Mask
The bloom dirt mask effect uses a texture to brighten up the bloom in some defined screen areas. This can be used to create a dirty look or a more impressive HDR effect, or to simulate camera imperfections.
Intensity
Scales the color of the bloom dirt mask effect (linear). This property is used to tweak dirt mask brightness.
Bloom
Bloom is a rendering effect used to simulate the real-world phenomena seen on bright objects on much darker backgrounds, and helps to add realism to the scene.
Method
Intensity
Scales the color of the whole bloom effect (linear). Possible uses: fade in or out over time, darken.
Threshold
Defines how many luminance units a color needs to have to affect bloom. In addition to the threshold, there is a linear part (one unit wide) where the color only partly affects the bloom. To have all scene colors contributing to the bloom, a volume of -1 needs to be used. Possible uses: tweak for some not real HDR content, dream sequence.
Vignette
Vignette simulates the effect that occurs with real-world camera lenses, seen by loss of light (darkening) near the edges of the image.
Intensity
Motion blur
If the graphic elements seem staggered in fast camera movements, apply motion blur.
Amount
Screen space reflection
Screen space reflection alters the reflected appearance of objects on surface materials based on screen space.
Intensity
Quality
Screen percentage
Screen percentage is a resolution-scaling technique used to render a lower- or higher-resolution image than what is actually being presented. Adjusting the screen percentage allows you to maintain a balance in your scenes between performance and image resolution quality.
Undersampling/Oversampling
Effects applied to Video
This effect is applied to the main video source.
Bloom
Intensity
Color grading
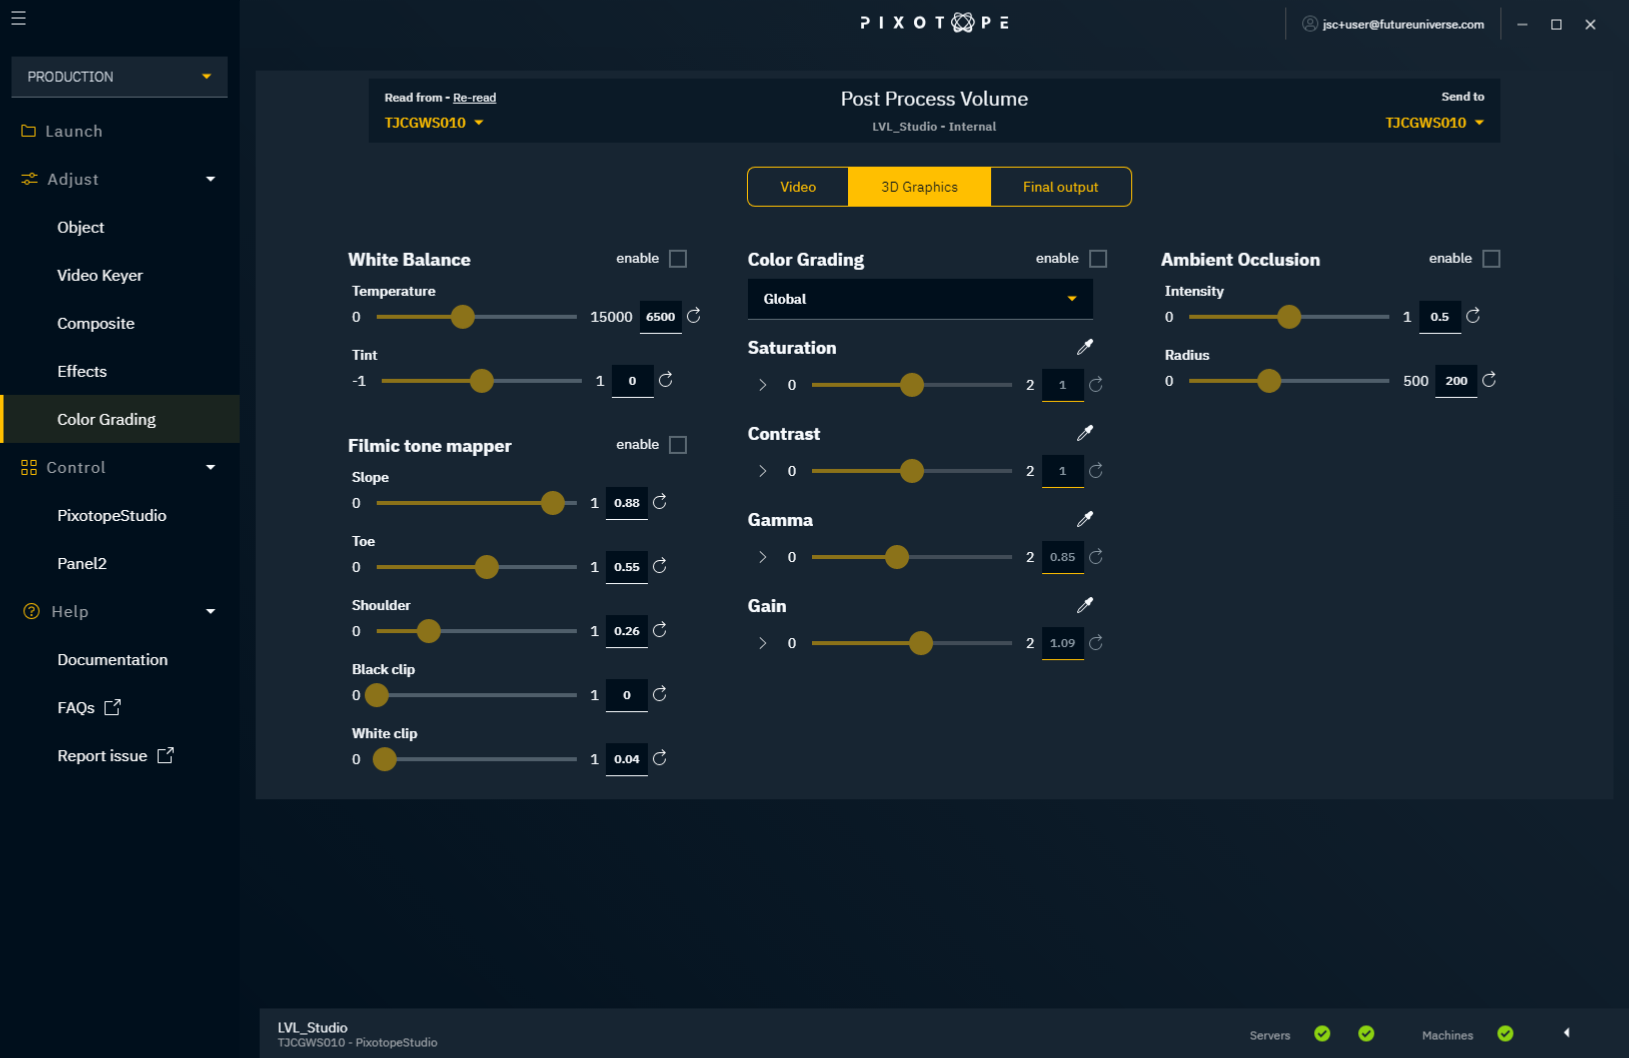
The color grading panel allows control to make live adjustments to the video, the 3D graphics and the final output. It is used to tweak the output for realism, but also permits artistic freedom.
- "Video" - the color grading of the camera system projection
- "3D Graphics" - the color grading of all 3D objects including mapped input media
- "Final output" - color grading on everything combined
White Balance
White balance is used to correct the lighting so that white is displayed as "true white". If the white balance is on the cold side, white appears more blueish.
When enabled, it allows you to adjust the white balance (graphics/video/both).
Temperature
Controls the white balance temperature. A higher value results in a warmer white.
Tint
Controls the color tint of the white balance. A higher value adds more cyan and magenta to the color range.
Color Grading
Color grading is used to adjust the overall color representation in the scene.
Mode
- Global - adjust the color globally
- Shadows - adjust the color values for shadows in the scene
- Midtones - adjust the color values for midtones in the scene
- Highlights - adjust the color values for highlights in the scene
Saturation
Controls the intensity of the colors. A higher value results in more pure colors. Use the arrow to reveal individual RGB sliders.
Contrast
Controls the tonal range of light and dark color in the level/scene. A higher value will tighten the highlights and darken the level/scene. Use the arrow to reveal individual RGB sliders.
Gamma
Controls the luminance intensity of the mid-tones color. Use the arrow to reveal individual RGB sliders.
Gain
Controls the luminance intensity of the whites (highlights). Higher values result in more washed-out highlights. Use the arrow to reveal individual RGB sliders.
Filmic tone mapper (3D graphics only)
Tone mapping is used to map the colors in a high dynamic range and convert them to a limited dynamic range that a regular display can output.
The purpose of the Tone Mapping function is to map the wide range of high dynamic range (HDR) colors into low dynamic range (LDR) that a display can output. This is the last stage of post-processing that is done after the normal rendering during post-processing. The process of tone mapping can be thought of as a way to simulate the response that the film has to light.
Slope
Controls the steepness of the S-curve. A higher value results in a steeper curve (darker).
Toe
Controls the dark color. A higher value results in darker colors.
Shoulder
Controls the bright color. A higher value results in brighter colors.
Black clip
Controls the cut-off point for black. In general, this value should NOT be adjusted.
White clip
Controls the cut-off point for white. This will appear as a subtle change in most cases.
Ambient Occlusion (3D graphics only)
Ambient occlusion is basically an effect that creates a more natural ambient lighting in the scene. It calculates how objects (occlusions) are exposed to ambient lighting and creates a diffuse non-directional shading effect in sheltered and enclosed areas.
When enabled, you can make live adjustments to the effect.
Intensity
Controls the amount of the effect applied. A higher value results in more shading effects.
Radius
Controls the radius from the occlusions where the effect is applied.