1.2 | Getting started with Pixotope
What you will learn
Here you will learn how to do a simple virtual studio production using:
- 1 tracked camera
- 1 computer
- 1 Pixotope Live license
Learn more about 1.2 | Planning your virtual production.
Or check out the following links to get an overview of Pixotope, its concepts and components.
Schematic
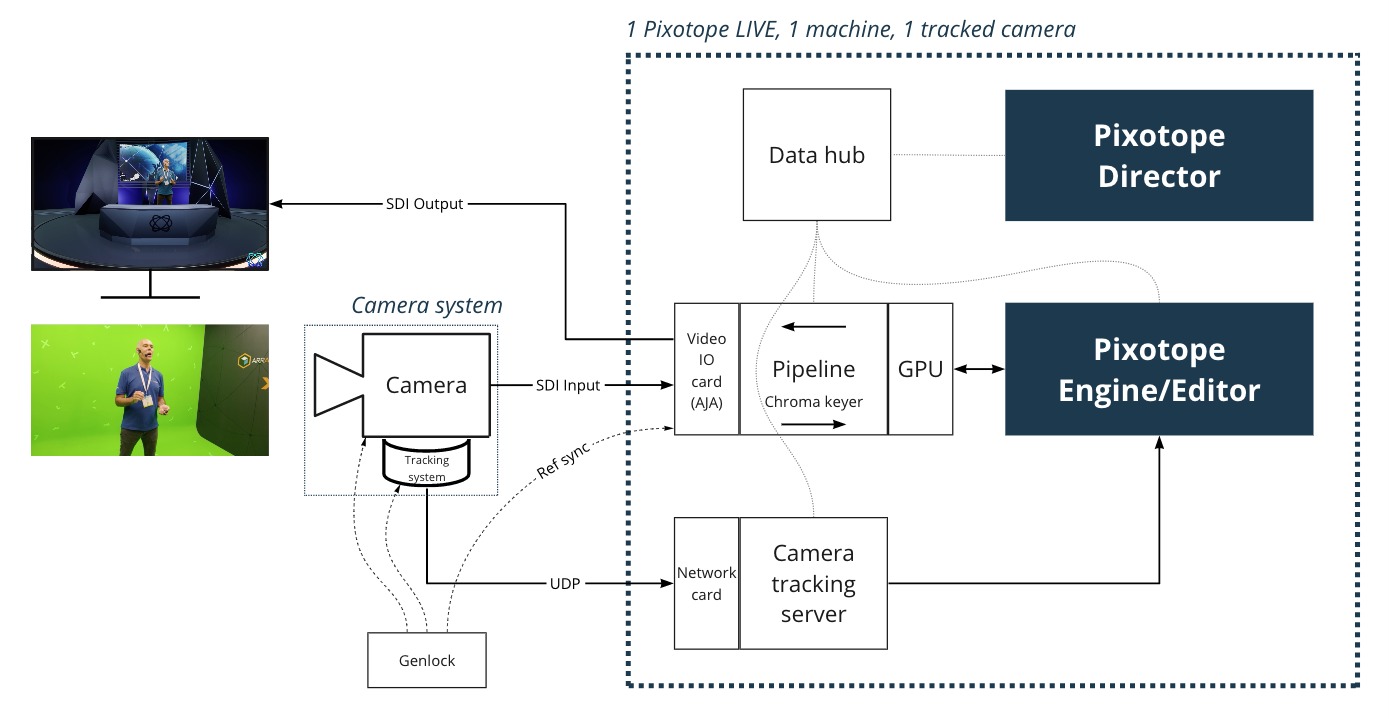
- Camera system
- Camera
- The captured video comes in via an SDI input on the video card
- Signal gets keyed or just passed through into the Pixotope Engine
- Tracking system
- Tracking data comes through the network card
- Camera
- Pixotope's Camera Tracking Server translates the data and sends it to the Pixotope Engine
- Pixotope Engine translates the real camera into a virtual one
- The rendered virtual scene gets merged with the real scene
- The scene gets output through the video card
- Pixotope Director is the main software you interact with
- Can be used locally or remotely
- It controls all aspects of Pixotope
- The Director is connected via the Data hub to the other components
- Pixotope Data hub
- In a multi-camera multi-computer setup, the Data hub connects all Pixotope computers with each other. See multi-camera setup.
Example projects using Pixotope
Pixotope lets you merge the real and the virtual world, in real time and in perfect quality.
To see what Pixotope has made possible, visit https://www.futureuniverse.com.
Or try it out yourself and download our example projects.
Check beforehand
- The machine is set up
- Network card(s) is/are installed
- Graphics and video I/O cards are installed and use the required drivers - See system requirements
- The camera is set up
- The tracking system is set up
- A user account with a valid LIVE license is available - 1.2 | Managing users and licenses
- Pixotope is installed - 1.2 | Installing Pixotope
Start Pixotope Director
The Pixotope Director is the main interface for setting up, adjusting and controlling a Pixotope virtual production.
- Start Director
- Log in
- Choose a Live license
The interface
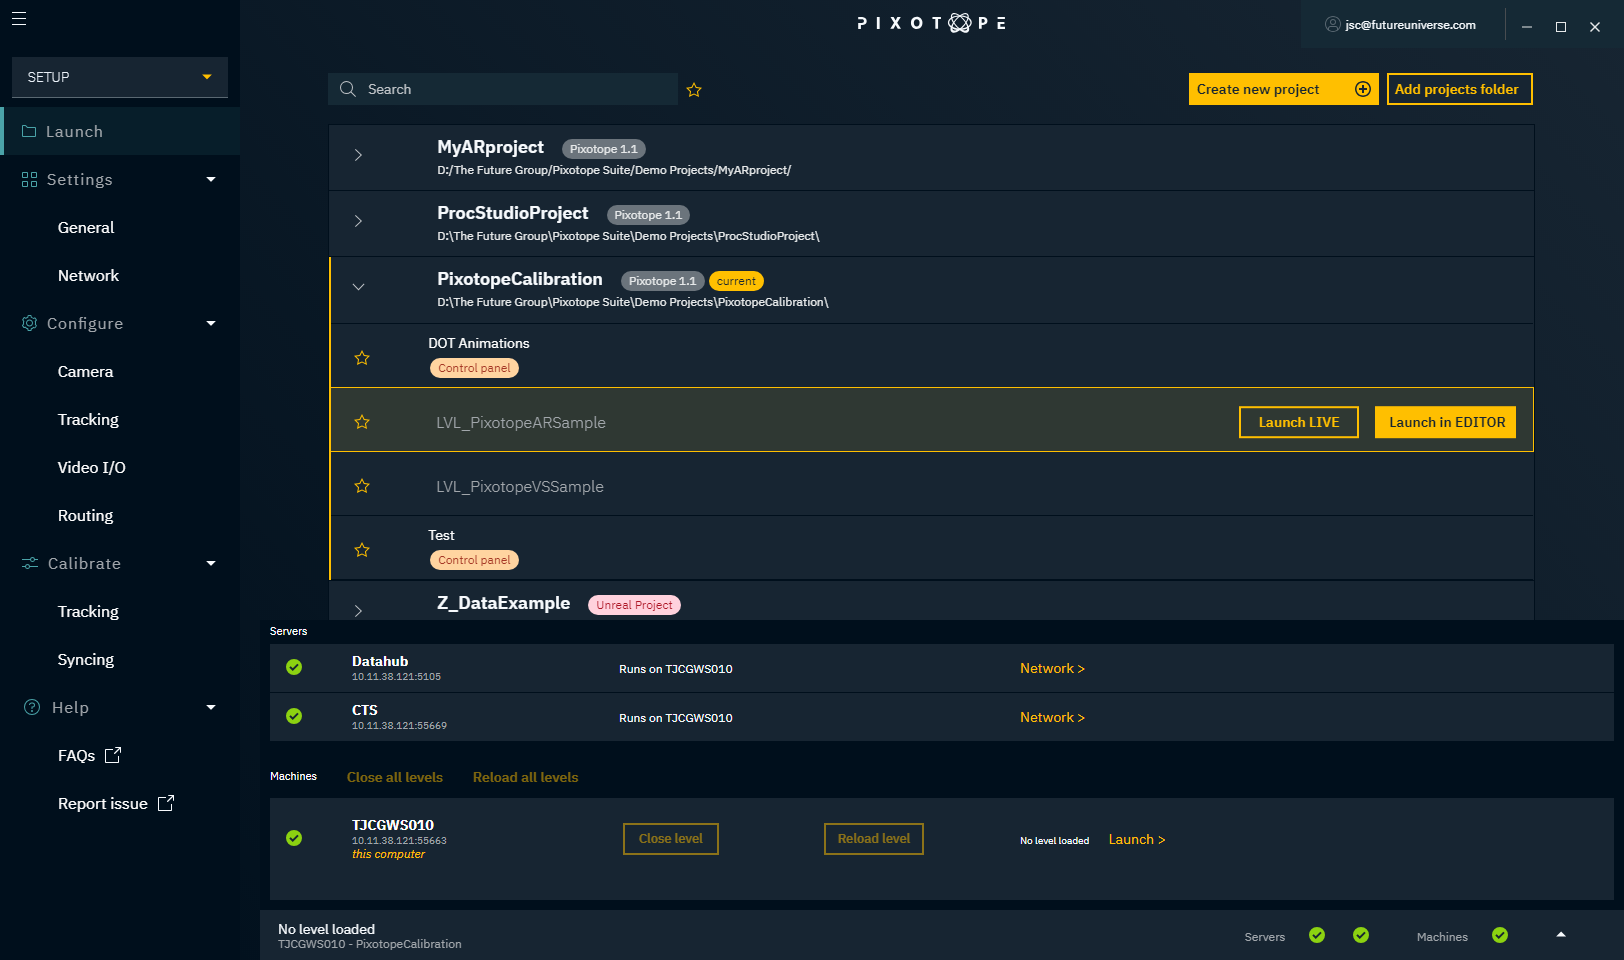
- The main menu on the left is divided into 2 different views:
- The SETUP view is used for setting up the machine together with the camera and camera tracking
- The PRODUCTION view is used for adjusting running levels and also controlling them through your control panels
- The "Launch" panel is used for browsing your projects and launching levels
- This panel is present in both modes
- The user menu in the top right-hand corner gives user- and license-related options
- The status bar at the bottom shows all the servers and Pixotope computers connected to this Data hub
Learn more about the SETUP and PRODUCTION views.
Learn more about how to 1.2 | Starting Director.
Set up the machine
Set up the machine together with the camera and camera tracking.
Learn more about how to 1.2 | Setting up a Pixotope machine.
Create a project
All Configure and Calibrate steps are stored per project and on each Director machine individually.
You can easily import a previous setup from another project or another machine. Learn more about Importing a setup.
Add a camera system
Specify your camera setup by:
- Choosing your camera's film back size
- Choosing your camera's lens aperture
Learn more about SETUP → Configure → Camera
Configure camera tracking protocol
- Choose the camera tracking protocol and if necessary change its default configuration
- Choose the camera mount
- Choose a lens file if available
- Check whether your camera system has a Camera Tracking Server assigned
- On your camera tracking hardware, enter the Camera Tracking Server's IP and port and start sending tracking data
- Check the status field for incoming tracking data
When doing Calibrate → Tracking, you might have to come back to change some of the configurations.
- If the camera movement is mapped wrongly, change the mapping
- If the camera movement moves in the right direction but is scaled, check the "unit" configuration
Learn more about SETUP → Configure → Tracking
Configure video inputs and outputs
- Configure the input format of the camera system
- Add video output and configure its format
- Add additional media inputs (optional)
Learn more about SETUP → Configure → Video I/O
Configure routing
Recreate the physical routing of your machine.
Learn more about SETUP → Configure → Routing
Test video and tracking configuration
To test whether your configuration was successful, let's launch a level and see whether camera tracking and video input and output are configured correctly.
Launch level
- Go to the "Launch" page
- Expand the current project
- Launch in Editor to open the Virtual studio template level that was created for us
Learn more about the different ways to launch a level: 1.2 | Edit, Preview Live and LIVE mode.
When you launch a level for the first time, it can take a bit longer to launch as shaders and other elements have to be prepared.
Calibrate tracking and syncing
This step is about matching the real with the virtual world. The placement and movement of the real-world camera have to exactly match the placement and movement of the virtual camera.

This is a 2-step process:
- Match the location in Calibrate → Tracking
- Match the timing of the video and tracking signal in Calibrate → Syncing
While this should primarily be handled by the tracking systems and their operators, Pixotope allows real-time adjustments to correct any misalignment or synchronization issues.
Learn more about SETUP → Calibrate → Tracking
Learn more about SETUP → Calibrate → Syncing
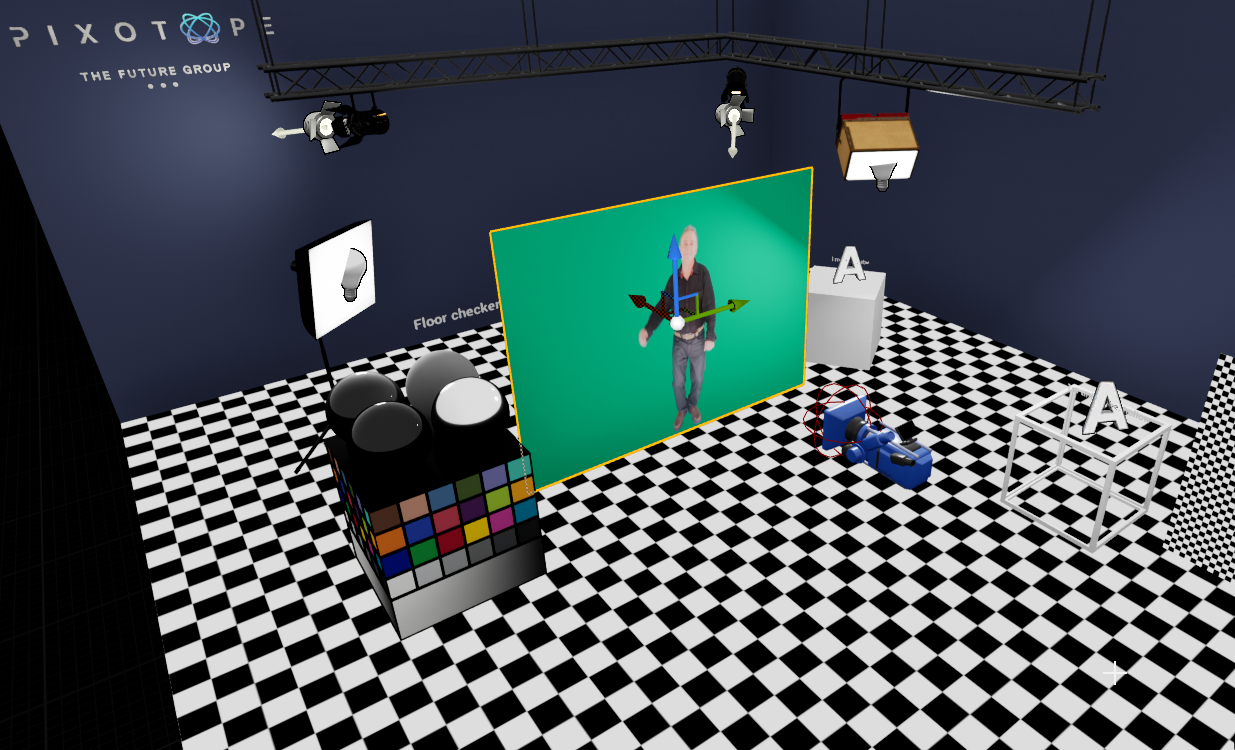
Prepare a simple VS level
For a virtual studio, we need to place the talent in our 3D environment.
- Film the talent with a tracked camera in front of a green screen
- Key the video feed with Pixotope's video keyer
- The keyed video is projected onto a compositing plane
- Position the compositing plane in the virtual studio
Learn more about AR and VS levels in 1.2 | Setting up a Pixotope project.
For artists using the Pixotope Editor:
Learn more about how to 1.2 | Preparing levels in Pixotope Editor.
To perfectly match video and 3D graphics, use Pixotope's adjustment panels.
Key video and adjust compositing
Getting keying and compositing right is another important part of creating a realistic virtual production.
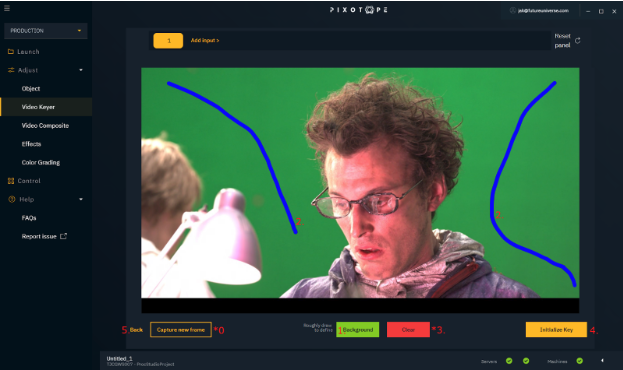
Key video
The internal keyer is an easy tool to set up a real-time chroma keyer which is used to key our video input.
- Select the camera system you would like to key
- The camera system input type must be set to "Internal Keyer" in SETUP → Video I/O
- Initialize the key
- Click "Background"
- Label the background area by drawing a couple of strokes
- Click "Initialize Key"
- Use the "Show alpha on SDI output" checkbox to toggle the alpha mask on the SDI output
- Refine the key
Learn more about PRODUCTION → Adjust → Video Keyer
Adjust video composite
The level has a compositing plane and the keyed video input is mapped onto the plane.
- Select the compositing plane in PRODUCTION → Adjust → Video Composite → Plane specific
- Position the compositing plane in-depth
- Scale it to cut away surrounding unkeyed garbage areas
- Tweak the Z-position so the keyed video intersects nicely with the floor and realistic shadows are cast on it
- If no shadows appear, make sure you have a directional light set up and the compositing plane has "Cast virtual shadows" activated
Go to the "General" tab in PRODUCTION → Adjust → Video Composite
Fine-tune the compositing plane
This can also be done directly in the Editor.
Learn more about PRODUCTION → Adjust → Video Composite
Adjust effects
The camera effects and color grading possibilities for the 3D graphics, as well as for the video, are the final things you would adjust. Try it out yourself.
Learn more about PRODUCTION → Adjust → Effects
Adjust color grading
Grade your 3D graphics and video so the 2 different sources match.
Learn more about PRODUCTION → Adjust → Color Grading
Create a simple control panel
In the Editor: Expose the properties you would like to control

Learn more about how to Expose properties.
- Create a new control panel
- Create a trigger widget
- Add a target action
- Save your control panel
Learn more about how to 1.2 | Creating a custom control panel.
Run live
- Launch your level in LIVE mode
- Use the control panel to control your level
Learn more about how to 1.2 | Running live production.
Data integration and API
For data integration into and API control of Pixotope levels, see 1.2 | Advanced - Pixotope API.
More
Find additional information here: